Saturday, June 26, 2010

Our (fiber)glass is half full

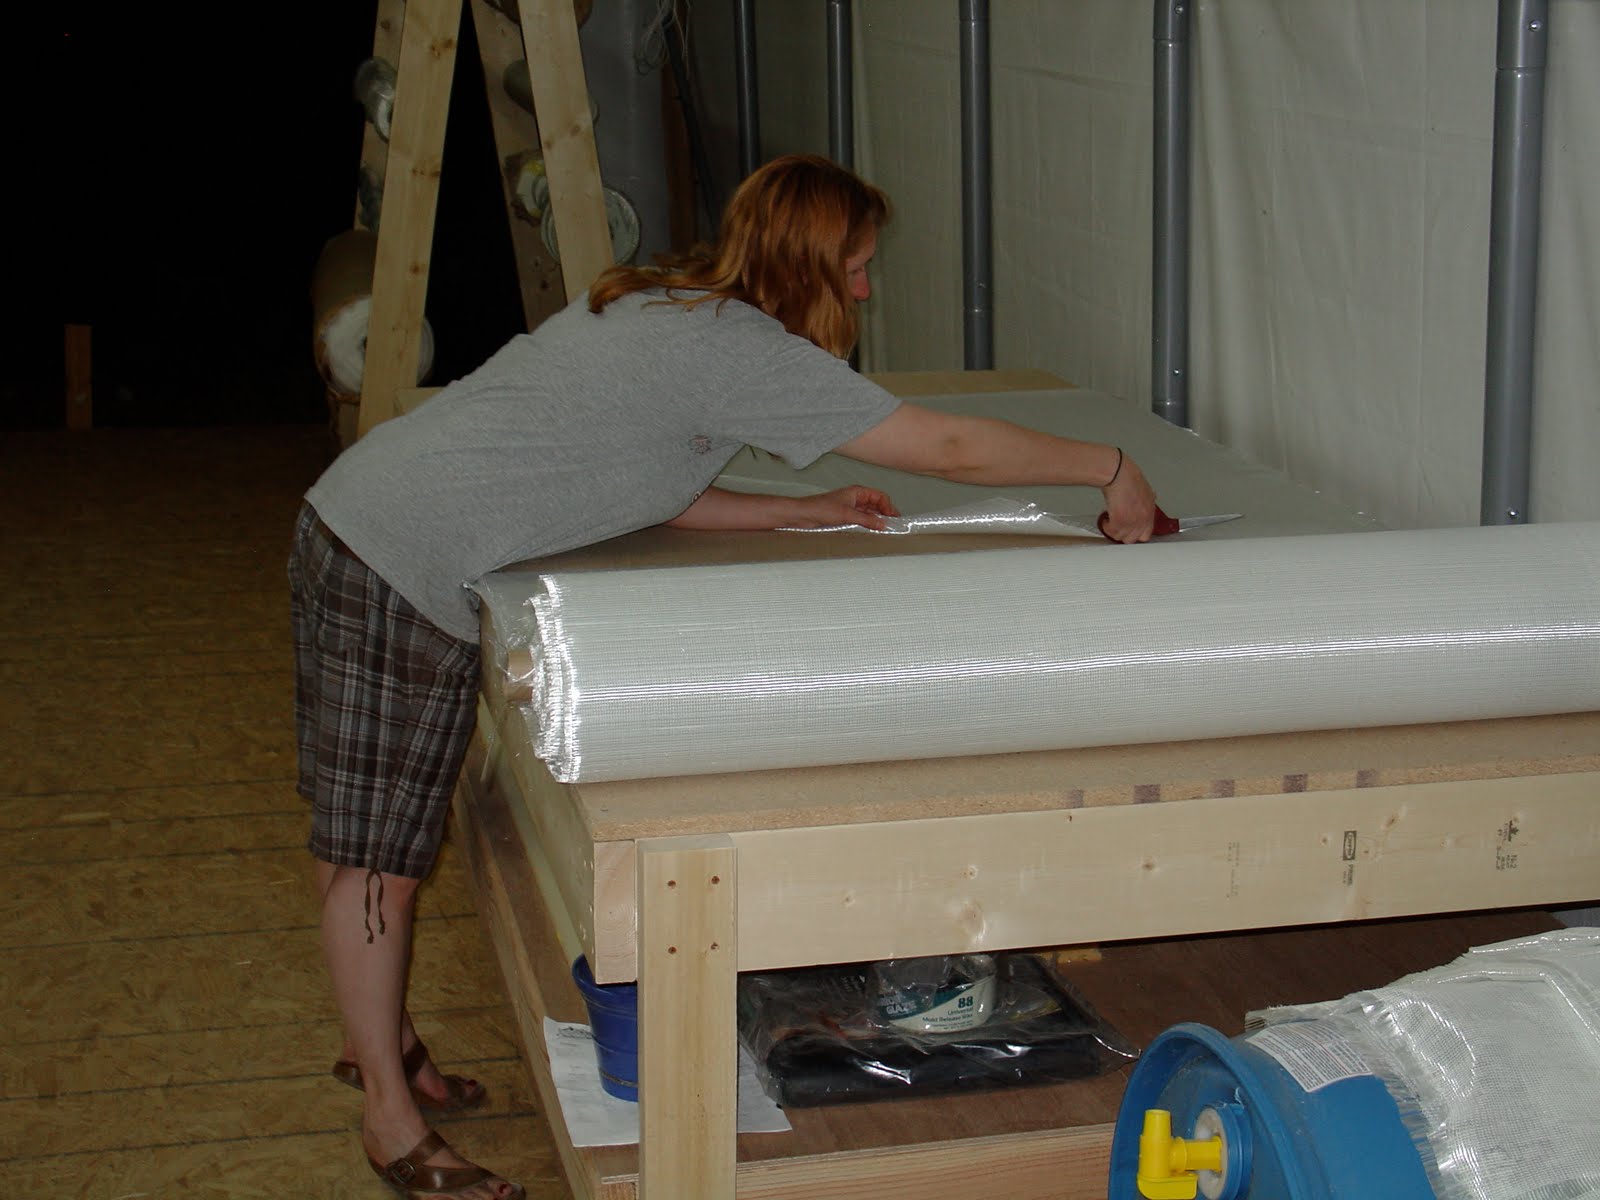
We spent the week prepping to laminate the interior layer of glass in the first float hull half.  To make the process go smoother, we cut all the glass fabric ahead of time.  We were careful to number or mark each piece of fabric so we could keep track.  Here you see lovely Dawna cutting a piece of 12 oz bi-directional fabric.  The direction of the glass fiber bundles (warps) is critical in optimizing the strength of the structure with minimal material.  We also cut some unidirectional glass reinforcing, and peel-ply.  The peel-ply is normally used for vacuum lay up (coming soon to our boat house), but can also be used with hand wet out lamination to produce a better finished surface.  The peel ply is a nylon fabric treated so the epoxy will not strongly adhere to it.  After the epoxy cures, we can peel it off (hence the name).
Here is a piece of glass fabric being dry fit to ensure we have enough excess to allow positioning when time is running out.  After cutting all the glass fabric, we fabricated a reinforcing stringer out of foam (see photos below), marked the interior for easier placement of the reinforcing layers and bulkheads, and then did a final sanding to remove any shine from the previous epoxy skim coat.  We were careful to not touch the surface after sanding without gloves on to avoid getting skin oil on the surface, which could inhibit good bonding (even more than our poor technique).
On Friday we were ready to start laminating.  Here is Dawna again, hard at work wetting out the BD glass.  This is working out nicely, Dawna does the hard work while I take pictures!  After the first two sections of fabric were wet out, and the peel ply was applied, we came to the conclusion that glassing concave surfaces is a pain in the butt.  It takes some patience and practice to get the glass wetted without shifting it and producing gaps between the fabric and foam.  Of course, by the time we really got the rhythm of the process, the temperature in the boat house was in the nineties.  This is not exactly ideal conditions for working with epoxy, but the slow set MAS epoxy still gave us about 30 minutes of working time before it started to gel.  It took us about 3 hours to do all of the laminating for the interior, including extra layers where the bulkheads will be installed and installing the foam core for the stringer.  I had to finish the lamination of the stringer and a couple extra layers of reinforcing on Saturday, but that only took about 1.5 hours by myself.
And here is the finished product with the future happy sailor standing by.  I am pretty satisfied with the way it turned out.  I am sure we have not optimized the resin to glass ratio, but we tried to only apply enough resin to saturate the glass fibers.

You may note that I still have to trim the edges, an easy task with a sharp knife.  You might also note that we only used the peel ply for the two stern sections.  It was adding too much time and effort to justify for the interior of a float.  We decided to use this as an opportunity to compare the two surfaces.
Conclusion:
peel ply = smooth, with very fine texture
no peel ply = rough with the texture of the glass
I think the peel ply will be very nice for the exterior and the main hull where final texture really matters.
Here you can see the reinforcing stringer glassed onto the forward third of the side of the hull.  The foam core was bonded to the hull with a mix of epoxy and microballoons.  The primary strength of the stringer comes from a layer of unidirectional glass along it's length.  This is then overlaid with a layer of BD glass to bond it all together and to complete the box beam design of the stringer.

Next steps are to make the bulkheads and install them.  Then we can remove this half and start the next.  Ah, the scent of progress (actually progress smells a lot like stinky arm pits!)

Sunday, June 20, 2010

Epoxy pox

At last, we started mixing epoxy.  Here you see a section of the float hull planking that has been filled with a mixture of epoxy and microballoons.  This makes a light weight filler that also sands easily.  Microballoons are very interesting.  They behave like a cross between a gas and a fluid.  They are so light that they tend to "evaporate" while trying to scoop, making a microballoon fog.  And then they flow like a fluid due to their microscopic spherical shape.  Definitely need to wear a dust mask or respirator when mixing in the balloons.

You can see where I filled the screw holes on the surface of the planking.  I also filled any remaining gaps between planks since a void has zero shear strength.  Of course I managed to miss one void near the aft end, so I'll get that filled when we start glassing, otherwise I would have to waste too much epoxy for a tiny gap.

We actually coated the surface with a thin layer of epoxy + balloons earlier, and then sanded prior to this final patching task.  However, in the future I would not do the skim coat, I would just do the patching.  The skim coat has to be sanded down well to ensure a good bond with the next layer of glass and epoxy.  But the bond between the epoxy and raw foam core is somewhat stronger.  The sanding is also an extra hours worth of dust generation, though I did get to try out the Tyvek suits and respirator! Should be a good bond regardless, so this was another learning experience.
While cleaning up in the evening, we had an inspector stop in to check out the surface quality.  This guy (gal?) definitely gets a better view of our work than I can.

Sunday, June 13, 2010

Our first stowaway!

Our neighbors kitten has decided that the boat house is a nice place to stowaway in.  She gave us plenty of help this weekend.  Here you see her making adjustments to the strongback and center reference line.  Apparently she hasn't read Ian's construction plans that clearly state the critical importance of maintain the placement of the center reference line.  She seems to think it makes good kitty cat floss!

More woodworking projects and epoxy talk

Just when you think we are building a boat, we revert to high school wood shop!  Our next step is to mix some fairing putty (epoxy resin + hardener + microballons) to fill the holes and gaps between foam planks, as well as a few of the worst sanding faux pas.  This will be minimal since we are working on the interior, so fairness is not critical and fairing compound would only add weight.  In any case, this means we need to crack open our barrels of MAS resin and hardener.  I purchased a fancy drum cradle from an industrial supply company, but I was not very happy with the stability of the 350 lbs barrel on it.  It tended to want to stand back up, which seems like an undesirable feature.  So I decided to build my own cradles for the 30 gallon resin barrel and 15 gallon hardener barrel.

Here you see the results of a half days effort.  The first photo shows how the cradles are constructed.  Very simple design, just a 3/4" plywood shell with 2x4 reinforcing the corners and a 2x4 bed to distribute the weight of the barrel.

The second photo shows the barrels happily resting in their new custom-fit cradles.  You'll notice I installed two spouts in the 30 gal. drum.  The top one allows me o vent the drum.  On the smaller hardener drum, the second bung hole (yes that is the real name for it) is the wrong size for my spouts, so I'll just crack it open to vent.  In case you are wondering how we got the barrels tipped over without any significant pain and suffering, I strap the cradles to the drum while upright.  Then carefully push over, while lifting the bottom of the barrel until it all tips horizontal.  It was really quite easy (easier than I expected), and even easier than the specially built cradle I bought.  And these cradles are very stable.  I have no fear of them tipping in any direction.

You'll notice from the label that we are using MAS epoxy resins.  I spent some time comparing the various brands, and went with MAS for several reasons. First, we needed a slow hardener since we are working in a tent with no insulation and no cooling in summertime.  Since we have yet to prove our selves in the world of resin, we wanted to maximize our chances of success by using a mix with a longer cure time, and MAS slow hardener is pretty long (about 50% longer than medium hardener, and 2.5x longer than fast hardener).  When temperatures start falling, and we are a little more experienced, we will order another set of resin/hardeners, and may go to the medium at that time.  Second, they claim that the slow hardener has minimal or no blush (a milky film that forms on the surface of cured epoxy and adds many hours of sanding time).  We'll see if this pans out, but sounds good to me for now.

The first float half foam planking

We finished the foam planking for the first float half on Friday.  Dawna tried her hand at form and fitting the planks as well.  So hopefully she will do the thermoforming and edge prep.  She didn't care for the gluing part, so I will do that.  Combined, it should make for a pretty efficient production process.  Even with the learning curve on the first half, it only took about a week, with about two full days of actual work.

After some additional trials with the toaster oven, we reduced the heating time to 5 minutes.  The planks deform some around the edges, and also have a tendency to "scallop" which makes for a less fair surface.  We reduced the time to try to reduce these effects.  The planks still bend pretty easily, though with less time available for mucking around.
In the photo you can see the fully planked half.  We also sanded the glue seams and overall inner surface after trimming the edges to the forms.  The glue seams tended to form ridges of urethane foam which had to be faired.  I also wanted to minimize the urethane glue surface area so the epoxy could primarily bond with the foam.  The foam sands very easily, but the glue tends to be somewhat flexible, so there was some trials and errors (mostly errors) in figuring out how to clean up the glue seams without gouging out the foam.  We haven't yet tried out the "real" fairing techniques with longboard, we just used a random orbit sander and hand work.  Unfortunately, while developing a feel for the sander I made a somewhat lumpy section near the stern in the concave bend.  After backing off on the effort, we found a good balance that left a satisfactory surface condition.  Since this is the inner surface that will not generally be visible, the fairness is not critical, but I look forward to improving my abilities on the next half.
Here you can see the template we made to mark the stern shape.  I added spacers that straddle the form frames to ensure I have the proper placement.  Ian Farrier's plans include the full size drawing of the stern shape, as well as all the other key forms.  I transfered the shape to the curved hull surface by marking points every inch or so with an adjustable woodworker's square.  Then I connected the dots and cut the foam to shape with a sharp knife.


Sunday, June 6, 2010

Planking the first float hull half

After numerous distractions and test starts, we finally started to make progress on real, live boat construction.  Here you see about 2 hours worth of progress on planking a half of one of the float hulls (haven't decided which one yet).  This is the bow end.  As you can see, it takes lots of screws to hold the planks in place while the glue sets.  The screws and ply pieces will be removed after the glue sets and replaced with screws through the bottom of the forms (exterior side of the hull), so the interior glassing can be completed.  Then additional reinforcing elements and the bulkheads will be installed.  By then, the hull half should hold its form pretty well so it can be removed from the form.  Of course, this is a trimaran, so I get to start all over again on the second float half at that point, and then we flip the form frame around and make two more half sections to complete the floats.  Then it is on to the main hull ...

I am using a water activated polyurethane adhesive (similar to Gorilla Glue) to join the foam core planks.  This makes the planking process easier - just spray the edges, apply poly glue, and clamp in place while it foams.  And it should sand about the same as the foam, which is important for fairing the hull surfaces.  The seam between planks only needs to be as strong as the foam since the glass fiber will handle the structural loads.  The core serves as a spacer between the glass/epoxy surfaces in this composite sandwich. This type of construction works just like an I-beam, with the skins in compression/tension, while the core resists shear stresses.
At the end of the weekend, I had hoped to finish planking the entire hull half.  Unfortunately, a heat wave arrived and the temperature in the boat house skyrocketed into the 100's.  I called it a day early on Saturday when the thermometer inside hit 111 F!  (It was in the 90's outside)  The foam didn't care, but I wimped out.  Sunday was much better (only hit 101 F inside, and then thunderstorms provided welcomed relief), so I was able to make some progress.  I completed about 75% of the planking, including replacing the screw and ply clamps with screws through the bottom of the frame battens.  I used 1-1/8" fine thread drywall screws which were the perfect length to get maximum hold on the foam without going all the way through.  In the photo you can see what it looked like at the end of the day.  There are still a few screw and ply clamps on the last couple of planks because the glue hadn't quite set yet.  In any case, I can almost see a boat hull in there if I tilt my head and squint!

The first boat bits

Finally, we started laying down the foam core planks.  Here you can see the first three pieces in the form frame for the float hulls.  We were just trying out the process, so nothing too dramatic, but it it is momentous occasion in any case.  I can already hear the waves lapping against the hulls, the wind racing past the jib and main, ...  Well, at least it's boat construction!

In any case, these pieces were heated for 7 minutes in the giant toaster oven, bent to fit the frame, and held in place with screws and 2" x 2" x 3/16" ply squares.  The general idea is to construct the hulls in halves with the split through the vertical axis.  The halves are joined later (much, much later at this rate).  The planking is done in the vertical direction, rather than the usual fore and aft planking.  This type of planking is typical for Farrier designs, and saves lots of glue joints.  I am planning to use 8" wide planks mostly, with some narrower planks at the ends.

Here you can see how the planks hold their form after they cool.  It only takes a few minutes for these 9 mm planks to cool.  They do retain some spring, but once they are joined, glassed, and have bulkheads installed, they should hold the designed form.

Friday, June 4, 2010

A few other projects while waiting for materials

Two other woodworking projects that we completed while awaiting our boat bits was construction of a vacuum bagging table and a fabric rack.  Neither is strictly required to build the F-82, but both should be helpful.
Here is the vacuum bagging table I built for lay up of the flat components such as bulkheads and decks.  Again, nothing fancy, though we may decide to use it for our dining table in the future, okay maybe not.  I still have to stretch a pond liner over the top to provide the vacuum tight lower surface.  This was also an idea I stole from other builders.  Then I will have to assemble the vacuum system (you can see the pump sitting on the table).  It will be an automatic cycling vacuum system with a vacuum plenum so the pump doesn't have to run continuously.  For more info about vacuum pumping options, I highly recommend perusing the articles at Joe Woodworker (see links).


In an attempt to maximize storage and organization in "The Boat House" I added a shelf under the table for storing the Core-Cell foam core material, as well as a few sheets of marine ply.  As a cost saving measure, Noah's suggested using a supply of Core-Cell "offcuts" where possible. I was able to save about 30-40% on the majority of the foam core by purchasing sheets that had been cut down a couple inches on two sides.  These sheets and the marine ply fit snuggly under the table.  Unfortunately, the standard full size sheets I purchased are actually slightly oversized, and did not fit under the 4 ft. x 8 ft. table.


I also built a basic fabric rack for storing most of our glass, carbon, and bagging fabric rolls.  The rack is wide enough to store the standard 60" wide rolls, and has room for up to fourteen rolls.  I used pvc tubing for the support rails, which works find for the full width rolls.  For shorter rolls, the pvc pipe tends to sag, so I may replace some of the pvc with steel pipe to support the shorter rolls.  In addition to what you see here, there are two additional 110 lb rolls of biaxial glass that will be the primary glass reinforcing for the hulls and decks.  I also have a roll of unidirectional glass and a roll of unidirectional carbon fiber.  The glass is used for general directional reinforcing throughout the structure.  The carbon will be used for construction of the beams that link the floats to the main hull.  Although each of these rolls have approximately the same total weight of fabric, the carbon cost about five times as much.


Real live boat construction coming soon ...

Boat building starts with a toaster oven!?

While waiting for "The Big Order" to arrive, we spent time setting up a few tools to make construction easier.  The first was a giant toaster oven to heat the foam core so it could be bent to fit the forms without breaking.  This was definitely not my bright idea, I borrowed it from many other builders, and Ian Farrier suggests it as an option in his building manual.  You can see our version in the photos.  The first photo shows it with the front face removed so you can see how it is put together.  It is very basic in design, just a wooden box with rows of heat lamps on top and bottom.


In my version, I used four 250 watt lamps on top and bottom, for a grand total of 2000 watts.  This seemed sufficient given the generally thinner foam (mostly 9 mm) used in the F-82.  Using suggestions stolen from Allen Smith's blog about the construction of his f-41 catamaran (see links), I toast the foam for about 7 minutes.  This is long enough to make it more pliable, especially in tighter curves, but not close to sagging or molten.


Since I fully enclosed the box to help with efficiency, I needed a good way to get the foam in and out.  In the next photo you can see the sliding shelf I built to support the foam during toasting.  I am actually pretty proud of the slides I built from various bits of scrap wood.  They are very smooth, don't allow the shelf to bind, and support the shelf when fully extracted.  I am pretty good at making stuff that doesn't have to look nice or be built to any precision.  Not sure how that is to my benefit in constructing a nicely designed trimaran though, good thing Dawna has a good eye for detail.


Thursday, June 3, 2010

Setting up form frames

The first task in building this masterpiece of sailing perfection is to construct the form frames for the floats.  Here you can see the forms set up precisely spaced as specified in the plans.  In the first photo we are just starting to add the battens that define the final form of the float hulls. 


Around this same time as this photo we were also preparing "The Big Order," which includes all the raw materials for constructing the trimaran.  It is amazing how long it takes to spec and select the materials, in spite of the detailed materials list provided with the plans.  We purchased most of our supplies from Noah's Marine, and I highly recommend them for their good pricing, great advice, and willingness to work with me to ensure we got the best deal they could offer.  We also used Fiberglass Supply to fill in a few items, and they also offered good pricing and selection.


In this second photo, taken a few days ago and a few weeks after the previous photo, you can see the completed battens installation.  It didn't take that long to install the battens,I just didn't get around to taking the pictures until last weekend.  All in all, I think we spent about 3-4 days on the forms and battens. In the intervening time, we worked on other tools and accessories we are going to need on this project, as well as waited for delivery of the pallets of supplies.  More on this in our next post.

Wednesday, June 2, 2010

In the beginning ...

The purpose of this blog is to document our trials and tribulations in constructing a Farrier F-82R trimaran. Hopefully others can get ideas for how to (or more likely not to) construct a F-82R. And perhaps those of you already experienced in such matters, and certainly more capable than me, will offer suggestions for doing this better.

If you are not familiar with the Farrier series of multihull designs, you should definitely check out his website at: http://www.f-boat.com/index.html

This is definitely a family affair with Dawna providing the majority of the hard labor, Catherine providing motivational support, and Leo supervising. Although we are starting this blog in early June, this adventure actually started in March with the purchase of Ian Farriers highly detailed plans and construction of a tubular steel frame and fabric building in our backyard as you can see in the photo below.

And just in case you aren't convinced this is a somewhat whacky endeavor, note that we live in the high altitude deserts of New Mexico. Our nearest ocean is about 800 miles away. Nonetheless, we are sailors (at least we are learning to be) and enjoy summer sailing on beautiful Heron Lake near Chama, New Mexico. You'd be surprised how many sailors live in the high desert. In the not too distant future, the intent is to set sail for unknown lands (at least to us) on a cruising catamaran yet to be constructed. But first, we are building a crazy fast trimaran to get a taste of multihull sailing in the desert southwest.

So enjoy the show. I'll try to post updates regularly, though I tend to be somewhat lazy, so I apologize in advance for delays and jumps in progress if you are trying to follow along.