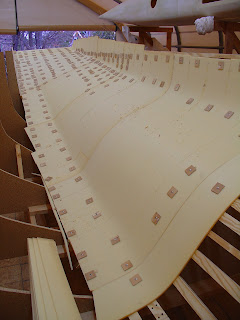
We made some more progress this weekend planking the port side of the main hull. As usual, not as much progress as I would like, but a journey of a million paces takes a million paces to complete (deep, huh!?). We finished planking up to the bow. I need to trim the keel line (upper right in photo), and eventually replace the top couple inches with high density foam. I had to make more wood clamping plates, and used all of them to get this far. They tend to disintegrate after a dozen uses, or so.
This view shows the complex curves of the lower hull. The floats will eventually tuck into the convex section of the lower hull when folded.
Once the planks are glued together, we hold the foam to the frame with a million drywall screws from the underside, as seen here. It is much easier to work under the main hull than the floats due to the orientation of the hull, but it still makes my neck ache.
Sunday, March 25, 2012
Sunday, March 18, 2012
Walking the plank, slowly
I'm still here, trying to make progress on planking the port side of the main hull. Unfortunately, I am currently a mucus-dripping, head-throbbing, achey-all-over worthless lump stuck on the couch thanks to a late-winter cold. Of course, last weekend I was dodging snow storms to get the planks I formed earlier glued together. This weekend was perfect (at least until this afternoon with yet another winter storm on its way), and I was hoping to finish the lower port side planking. Well, there is always next weekend ... achoo, sniff!
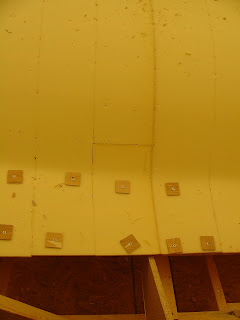
As you can see in the previous picture, I was able to glue together about eight feet of planking. This section is mostly held to the frame from underneath with drywall screws. I left a few clamping plates on the top side to keep things from moving until I finish the planking. The fold under the gunwale (lower left in photo) is making a nice fair line. I used lots of clamping plates along the seams while the glue set so the seams are very fair, making the entire hull fair. I did have one plank snap on me while trying to glue the planks together. It was pre-formed to the tight fold, but must have needed a little more heat to remove stress in the bend. Thanks to the extremely forgiving nature of foam core, I was able to cut and form a new piece to fill in the section that snapped. The curves match perfectly and this will all disappear in the glass laminate with no loss of strength.
As you can see in the previous picture, I was able to glue together about eight feet of planking. This section is mostly held to the frame from underneath with drywall screws. I left a few clamping plates on the top side to keep things from moving until I finish the planking. The fold under the gunwale (lower left in photo) is making a nice fair line. I used lots of clamping plates along the seams while the glue set so the seams are very fair, making the entire hull fair. I did have one plank snap on me while trying to glue the planks together. It was pre-formed to the tight fold, but must have needed a little more heat to remove stress in the bend. Thanks to the extremely forgiving nature of foam core, I was able to cut and form a new piece to fill in the section that snapped. The curves match perfectly and this will all disappear in the glass laminate with no loss of strength.
Sunday, March 4, 2012
Planking the main hull
Well, after much anticipation, I am finally starting to build the main hull. Progress has been slow as of late, due to a combination of untimely cold weather, other hobbies, and an easily distracted shipwright. But with daylight savings time just around the corner and temperatures generally on the rise, I am focussing on getting this hull looking like a boat. My goal is to have the hull together before next winter. Here is the first step on that path.
As you can see I planked about eight feet of the lower port hull. Actually, the planks have only been formed to the frame. I still have to glue them together. I also cut the planks for about 2/3 of the hull. I am using the same basic technique we used for the floats. The curves on the main hull are generally gentler than on the floats, so it is actually easier to form the planks to the frame. Some light heating with the heat gun takes care of most of the curves. The fold near the gunwale (bottom in the picture) and curve near the keel (top of picture) require a little more heating to form the foam to fit.
The wood plates are holding the planks in place until I finish gluing them together and hold the planking with screws from the underside. Next I will go back and remove each plank, glue the edges, and clamp them to the frame with the wood plates again. As we did with the floats, I will add a strip of packing tape on the frame under each seam to prevent the glue from adhering to the wood frame. Initially I am only planking the lower section of the hull below the gunwale because it would be too difficult to reach everywhere. Once the lower section is glassed, we will go back and plank the deck (to the left in the photo).
Subscribe to:
Comments (Atom)


